Notice: Trying to get property of non-object in /home/mo/prod/old.dpk/tools/smarty/sysplugins/smarty_internal_templatebase.php(157) : eval()'d code on line 72
href="/modules//smartblog/images/329.jpg" data-fancybox-group="other-views" class="fancybox shown" title="
Notice: Undefined index: imageTitle in /home/mo/prod/old.dpk/tools/smarty/sysplugins/smarty_internal_templatebase.php(157) : eval()'d code on line 76
Notice: Trying to get property of non-object in /home/mo/prod/old.dpk/tools/smarty/sysplugins/smarty_internal_templatebase.php(157) : eval()'d code on line 76
">

How to safely remove the GetCurrent folder in Windows 10
1. Introduction
2. Steps to follow
3. To read also
Introduction
When you update Windows 10, the operating system creates a hidden folder called $ GetCurrent on the local drive of your system. It contains the installation files and logs files for the latest update. So, once you have properly installed the updates, you can delete the $ GetCurrent folder.
Many users complain that after updating to Creators Update, this folder occupies a huge space of about 3 GB. Indeed, it includes the remaining Windows Update installation files. However, by default, these files are automatically deleted after 30 days. But users always find the folder in C: and it is necessary to delete it manually.
You can do this using two methods and both are very easy to follow. So, let us explore the means one by one.
Steps to follow: How to Safely Remove $ GetCurrent Folder in Windows 10
Method 1 - Using the File Explorer
1. First, run the file explorer to delete the $ GetCurrent folder. You can do this by clicking on its icon that exists on the taskbar or simultaneously press the Windows and E keyboard shortcuts.
2. Click the View tab, and select the Hidden Items check box on the ribbon that falls down.

3. Go to C: drive, locate the $ GetCurrent folder.
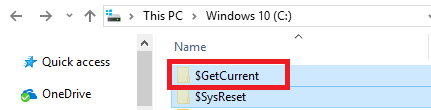
4. Right, click on it. Among the different options that appear, click Delete. You can also select the $ GetCurrent folder and press the Delete key on the keyboard.
5. If a confirmation dialog box appears, click Continue to approve.
6. Finally, if you prefer, you can uncheck the Hidden Items box.
Method 2 - Using the Elevated Command Prompt
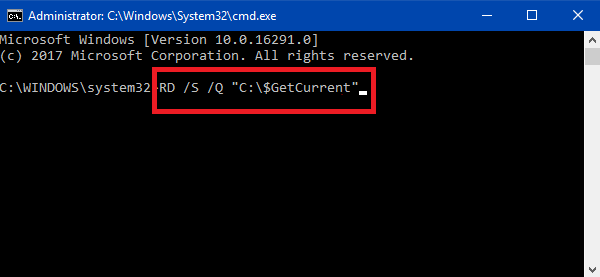
1. In the Cortana search box, type " cmd " and access the command prompt as an administrator.
2. Copy and paste the command below and press Enter to delete the $ GetCurrent folder.
RD / S / Q "C: $ GetCurrent"
3. That's it and you will not see the $ GetCurrent folder on your local disk anymore.
Finally, you see that with these two simple methods, you can easily delete the $ GetCurrent folder in Windows 10. However, you can not view this folder because by default it is hidden by the operating system. But when you delete that folder, you just get a lot of space.
To read also
How to Customize the Communication Tab in the Sound on Windows 10